ajax传输Object及@RequestBody的用法

通过ajax向后台传输object对象。

javascript

$.ajax({
    url:"rest/publicgarden/edit",
    type:"post",
    cache:false,
    dataType:"json",
    contentType:"application/json; charset=utf-8",
    data:JSON.stringify(oldValue),
    success:function(result){
        if (result)
            alertConfirm("修改成功");
        else
            alertView("修改失败");
    }
})

oldValue

JSON.stringify()

以将任意的JavaScript值序列化成符合JSON语法的字符串。

JSON.stringify({});                        // '{}'
JSON.stringify(true);                      // 'true'
JSON.stringify("foo");                     // '"foo"'
JSON.stringify([1, "false", false]);       // '[1,"false",false]'
JSON.stringify({ x: 5 });                  // '{"x":5}'

JSON.stringify({x: 5, y: 6});              
// '{"x":5,"y":6}' 或者 '{"y":6,"x":5}' 都可能

java

@RequestBody

@RequestBody接收的是一个Json对象的字符串,而不是一个Json对象。然而在ajax请求往往传的都是Json对象,后来发现用 JSON.stringify(data)的方式就能将对象变成字符串。同时ajax请求的时候也要指定dataType: “json”,contentType:”application/json” 这样就可以轻易的将一个对象或者List传到Java端,使用@RequestBody即可绑定对象或者List.

@RequestMapping(value = "/edit",method=RequestMethod.POST)
@ResponseBody
public boolean edit(@RequestBody Object value) {

    JSONObject jsonObj = JSONObject.fromObject(value);//将json字符串转换为json对象
    PublicGarden publicgarden = (PublicGarden) JSONObject.toBean(jsonObj,PublicGarden.class);//将建json对象转换为PublicGarden对象
    ipGardenServiceImpl.update(publicgarden);
    return true;
}

@RequestMapping(value = "saveUser", method = {RequestMethod.POST }}) 
@ResponseBody  
public void saveUser(@RequestBody List<User> users) { 
     userService.batchSave(users); 
} 

java与JSON相互转换详情请点击这里查看。

bootstrap-table之editable

editable

bootstrap table的修改,只需要引入

  • bootstrap-table-editable.js
  • bootstrap-editable.js
  • bootstrap-editable.css即可。

列属性上添加data-editable="true"

<th data-field="address" data-align="center" data-valign="middle" data-editable="true">地址</th>

bootstrap table 插件扩展了X-editable功能。
修改table属性触发editable-save.bs.table事件。

$('#table').on('editable-save.bs.table', function (field, row, oldValue, $el) {
    editSave(row,oldValue,name);
});

SpringMVC之转发请求和重定向

spring MVC框架controller间跳转和重定向

ModelAndView

return new ModelAndView("redirect:/user/toList");//redirect模式
return new ModelAndView("/user/toList");//默认为forward模式

若带参数请使用RedirectAttributes。

RedirectAttributes

RedirectAttributes是Spring mvc 3.1版本之后出来的一个功能,专门用于重定向之后还能带参数跳转的
他有两种带参的方式:

addAttribute

RedirectAttributes attr = null;
attr.addAttribute("name","123");
attr.addAttribute("message", "error");
return "redirect:/index";

相当于

return “redirect:/index?name=123&message=error”

addFlashAttribute

这种方式也能达到重新向带参,而且能隐藏参数,其原理就是放到session中,session在跳到页面后马上移除对象。所以你刷新一下后这个值就会丢掉

attr.addFlashAttribute("message", "success");

XML文档解读

[TOC]

关于XML文档的xmlns、xmlns:xsi和xsi:schemaLocation
参见Spring的配置文件

xmlns

xmlns其实是XML Namespace的缩写, XML命名空间。

为什么需要xmlns

考虑这样两个XML文档:表示HTML表格元素的table

<table>
  <tr>
    <td>Apples</td>
    <td>Bananas</td>
  </tr>
</table>

和描述一张桌子的table:

<table>
  <name>African Coffee Table</name>
  <width>80</width>
  <length>120</length>
</table>

假如这两个 XML 文档被一起使用,由于两个文档都包含带有不同内容和定义的

元素,就会发生命名冲突。XML 解析器是无法确定如何处理这类冲突。为了解决上述问题,xmlns就产生了。

如何使用xmlns

语法:xmlns:namespace-prefix=”namespaceURI”
例如:

xmlns:context="http://www.springframework.org/schema/context"

<context:component-scan base-package="xxx.xxx.controller" />

则上面的两个table可写成

<!-- 这里xmlns:h="url1"表示这个table是用h作为标记,table的写法在url1中定义 -->

<h:table xmlns:h="url1">
  <h:tr>
    <h:td>Apples</h:td>
    <h:td>Bananas</h:td>
  </h:tr>
</h:table>


<!-- 这里xmlns:f="url2"表示这个table是用f作为标记,table的写法在url2中定义 -->

<f:table xmlns:f="url2">
  <f:name>African Coffee Table</f:name>
  <f:width>80</f:width>
  <f:length>120</f:length>
</f:table>

xmlns和xmlns:xsi有什么不同?

xmlns表示默认的Namespace。例如:

xmlns="http://www.springframework.org/schema/beans"

这一句表示该文档默认的XML Namespace为http://www.springframwork.org/schema/beans。对于默认的Namespace中的元素,可以不使用前缀。例如Spring XML文档中的

<bean id="xxx" class="xxx.xxx.xxx.Xxx">
  <property name="xxx" value="xxxx"/>
</bean>

xmlns:xsi表示使用xsi作为前缀的Namespace,当然前缀xsi需要在文档中声明。

xsi:schemaLocation

xsi:schemaLocation属性其实是Namespace为http://www.w3.org/2001/XMLSchema-instance里的schemaLocation属性,正是因为我们一开始声明了

xmlns:xsi="http://www.w3.org/2001/XMLSchema-instance"

它定义了XML Namespace和对应的XSD(Xml Schema Definition)文档的位置的关系。它的值由一个或多个URI引用对组成,两个URI之间以空白符分隔(空格和换行均可)。第一个URI是定义的XML Namespace的值,第二个URI给出Schema文档的位置,Schema处理器将从这个位置读取Schema文档,该文档的targetNamespace必须与第一个URI相匹配。例如:

xsi:schemaLocation="http://www.springframework.org/schema/context 
                    http://www.springframework.org/schema/context/spring-context.xsd"

这里表示Namespace为http://www.springframework.org/schema/context的Schema的位置为http://www.springframework.org/schema/context/spring-context.xsd。

原文请参考:
关于XML文档的xmlns、xmlns:xsi和xsi:schemaLocation

method

由于在 RequestMapping 注解类中 method() 方法返回的是 RequestMethod 数组,所以可以给 method 同时指定多个请求方式

@Controller
@RequestMapping(path = "/user")
public class UserController {
        // 该方法将同时接收通过GET和POST方式发来的请求
    @RequestMapping(path = "/login", method={RequestMethod.POST,RequestMethod.GET})
    public String login() {
        return "success";
    }
}

params

@RequestMapping 中可以使用 params 来限制请求参数,来实现进一步的过滤请求

@Controller
@RequestMapping(path = "/user")
public class UserController {

        // 该方法将接收 /user/login 发来的请求,且请求参数必须为 username=kolbe&password=123456
    @RequestMapping(path = "/login", params={"username=kolbe","password=123456"})
    public String login() {
        return "success";
    }
}

如:http://localhost/SpringMVC/user/login?username=kolbe&password=123456

headers

@RequestMapping 的 headers 属性,该属性表示请求头

@Controller
@RequestMapping(path = "/user")
public class UserController {
        // 表示只接收本机发来的请求
    @RequestMapping(path = "/login", headers="Host=localhost:8080")
    public String login() {
        return "success";
    }
}

Sublime Angular snippets安装

这是john papa写的一个sublime插件,安装后可快速生成angular的模板,指令

ngcontroller // creates an Angular controller
ngdirective  // creates an Angular directive
ngfactory    // creates an Angular factory
ngmodule     // creates an Angular module
ngservice    // creates an Angular service
ngfilter     // creates an Angular filter

js文件中输入ngfactory,按下Tab键之后…

(function() {
    'use strict';

    angular
        .module('module')
        .factory('factory', factory);

    factory.$inject = ['dependencies'];

    /* @ngInject */
    function factory(dependencies) {
        var service = {
            func: func
        };
        return service;

        function func() {
        }
    }
})();

地址:johnpapa/angular-styleguide
下载下来之后,copy angular-styleguide/a1/assets/sublime-angular-snippets,放在sublime下的packages文件夹中,重启sublime即可。
出现一个问题,放入后没有反应,后来才发现未知不对,默认的sublime的插件安装地址是C:\Users\Administrator\AppData\Roaming\Sublime Text 3\Packages,所以将sublime-angular-snippets文件夹放入其中即可。

angular之Service vs Factory

angular有两种方法来创建服务:

  • 工厂 Factory
    factory提供一些公共的方法函数,推荐抽象,重用factory。
  • 服务 Service
    service类似factory,会被实例化,可以保存数据,作为controller之间的通讯工具,比好好用。

在Angular源码中的定义:

function factory(name, factoryFn) {
    return provider(name, { $get: factoryFn });
}
function service(name, constructor) {
    return factory(name, ['$injector', function($injector) {
      return $injector.instantiate(constructor);
    }]);
}

下面的例子展示了service和factory做了同样一件事情:

var app = angular.module('app',[]);
app.service('helloWorldService', function(){
    this.hello = function() {
        return "Hello World";
    };
});
app.factory('helloWorldFactory', function(){
    return {
        hello: function() {
            return "Hello World";
        }
    }
});

当helloWorldService或helloWorldFactory被注入到控制器中,它们都有一个hello方法,返回”hello world”。service的构造函数在声明时被实例化了一次,同时factory对象在每一次被注入时传递,但是仍然只有一个factory实例。所有的providers都是单例。
既然能做相同的事,为什么需要两种不同的风格呢?相对于service,factory提供了更多的灵活性,因为它可以返回函数,这些函数之后可以被新建出来。这迎合了面向对象编程中工厂模式的概念,工厂可以是一个能够创建其他对象的对象。

app.factory('helloFactory', function() {
    return function(name) {
        this.name = name;
        this.hello = function() {
            return "Hello " + this.name;
        };
    };
});

以下是一个控制器示例,使用了service和两个factory,helloFactory返回了一个函数,当新建对象时会设置name的值。

app.controller('helloCtrl', function($scope, helloWorldService, helloWorldFactory, helloFactory) {
    init = function() {
      helloWorldService.hello(); //'Hello World'
      helloWorldFactory.hello(); //'Hello World'
      new helloFactory('Readers').hello() //'Hello Readers'
    }
    init();
});

在初学时,最好只使用service。

Factory在设计一个包含很多私有方法的类时也很有用:

app.factory('privateFactory', function(){
    var privateFunc = function(name) {
        return name.split("").reverse().join(""); //reverses the name
    };
    return {
        hello: function(name){
          return "Hello " + privateFunc(name);
        }
    };
});

参考:

  1. AngularJS 开发中常犯的10个错误

angular的ajax请求chrome跨域报错(XMLHttpRequest cannot loadfile:* Cross origin requests are only supported for protocol schemes)

[TOC]

浏览器加参数”–allow-file-access-from-files”

ajax请求加载本地文件,chrome报跨域错误

XMLHttpRequest cannot loadfile:///C:/Users/Li/Desktop/images/alist.json.Cross origin requests are only supported for protocol schemes: http, data,chrome-extension, https, chrome-extension-resource.

解决方法:
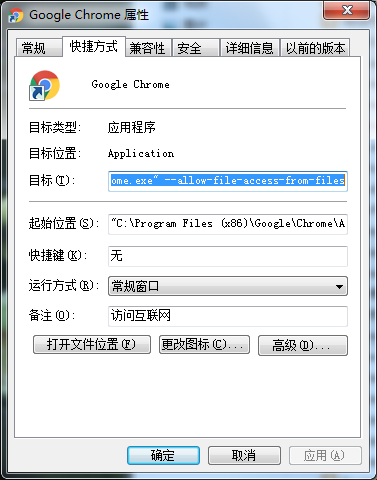
给chrome添加启动参数:--allow-file-access-from-files
具体方法:
在浏览器快捷方式上右键-属性-快捷方式-目标 如下图:

enter description here

tomcat

部署到tomcat中去,通过http://localhost:8080/XXX/#/index来访问

http-server

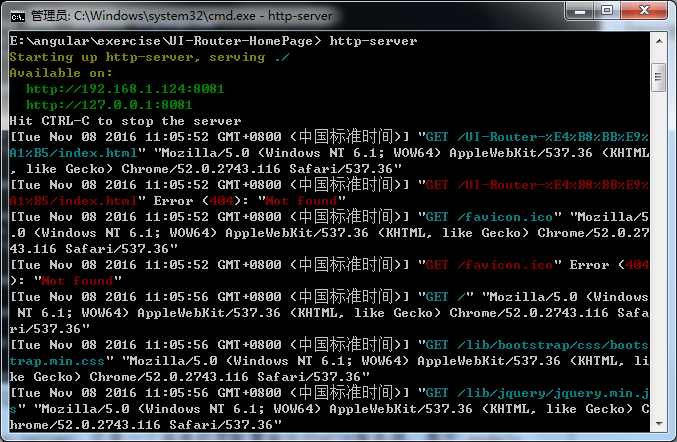
安装http-server,这是一个简单的零配置命令行HTTP服务器, 基于 nodeJs.

npm install http-server -g

Windows 下使用:
在站点目录下开启命令行输入

http-server

enter description here
访问: http://localhost:8081 or http://127.0.0.1:8081即可。

firfox

再或者你懒得倒腾各种方法就换浏览器吧,用firfox就可以啦。

angular常见错误分析(新手篇)

新手入门angular碰见各种错误,总结一下跟大家分享,希望有用。

[ng:areq] Argument ‘DemoCtrl’ is not a function, got undefined!

这往往是因为忘记定义controller或者是声明了多次module,多次声明module会导致前边的module定义信息被清空,所以程序就会找不到已定义的组件。

Error: [$injector:unpr]

unpr全称是Unknown Provider也就是说没有找到你注入的东西

Module

angular.module(‘MyApp’,[…])会创建一个新的Angular模块,然后把方括号([…])中的依赖列表加载进来;
而angular.module(‘MyApp’)会使用由第一个调用定义的现有的模块。
所以,对于以下代码,你需要保证在整个应用中只会使用一次:

angular.module('MyApp', [...]);

React Demo

[TOC]

React.findDOMNode()

React.findDOMNode()从组件获取真实DOM的节点。

var MyComponent = React.createClass({
        handleClick:function(){
            React.findDOMNode(this.refs.myTextInput).focus();
        },
        render:function(){
            return (
                <div>
                    <input type="text" ref="myTextInput" />
                    <input type="button" value="Focus the text input" onClick={this.handleClick}/>
                </div>
            );
        }
    });
    React.render(
        <MyComponent />,
        document.getElementById('example')
    );

ref

ref与React.findDOMNode()结合使用,该功能是为了结合现有非React类库,通过ref/refs可以获取得到组件实例,进而取得原生节点。

var Test = React.createClass({
    componentDidMount(){
      alert(React.findDOMNode(this.refs.content).innerHTML);
    },
    render(){
        return <div>
            <h3>header</h3>
            <div ref='content'>content</div>
        </div>;
    }
});

React.render(<Test />,document.getElementById('example'));

this.state

var LikeButton = React.createClass({
        getInitialState:function(){
            return {liked:false};
        },
        handleClick:function(event){
            this.setState({liked: !this.state.liked});
        },
        render:function(){
            var text = this.state.liked ? 'like' : 'haven\'t liked';
            return (
                <p onClick={this.handleClick}>
                    You {text} this.Click to toggle.
                </p>
            ); 
        }
    });
    React.render(
        <LikeButton />,
        document.getElementById('example')
    );

获取表单值

用户在表单填入的内容,属于用户跟组件的互动,所以不能用this.props读取。

  var Input = React.createClass({
    getInitialState:function(){
        return {value:'Hello!'};
    },
    handleChange:function(event){
        this.setState({value:event.target.value});
    },
    render:function(){
        var value = this.state.value;
        return (
            <div>
                <input type="text" value={value} onChange={this.handleChange} />
                <p>{value}</p>
            </div>
        );
    }
});
React.render(<Input />,document.getElementById('example'));

上面代码中,文本输入框的值,不能用this.props.value读取,而要定义一个onChange事件的回调函数,通过event.target.value读取用户输入的值。textarea元素、select元素、radio元素都属于这种情况。

  • value/checked属性设置后,用户输入无效
  • textarea的值要设置在value属性上
  • select的value属性可以是数组,不建议使用option的selected属性
  • input/textarea的onChange用户每次输入都会触发
  • radio/checkbox点击后也会触发onChange

如果设置了value属性,组件变为受控组件,用户无法输入,除非程序改变value属性。受控组件可以通过监听handleChange事件,结合state来改变input值。

ajax

具体见评论框示例中,ajax也可直接写在componentDidMount中。

评论框Demo

// 代码摘自官网教程
var CommentBox = React.createClass({
    getInitialState: function() {
        return {data: []};
    },
  loadCommentsFromServer: function() {
      getInitialState: function() {
        return {data: []};
      },
    $.ajax({
      url: this.props.url,
      dataType: 'json',
      cache: false,
      success: function(data) {
        this.setState({data: data});
      }.bind(this),
      error: function(xhr, status, err) {
        console.error(this.props.url, status, err.toString());
      }.bind(this)
    });
  },

  componentDidMount: function() {
    this.loadCommentsFromServer();
    setInterval(this.loadCommentsFromServer, this.props.pollInterval);
  },
  render: function() {
    return (
      <div className="commentBox">
        <h1>Comments</h1>
        <CommentList data={this.state.data} />
        <CommentForm />
      </div>
    );
  }
});

var CommentList = React.createClass({
  render: function() {
    var commentNodes = this.props.data.map(function(comment) {
      return (
        <Comment author={comment.author} key={comment.id}>
          {comment.text}
        </Comment>
      );
    });
    return (
      <div className="commentList">
        {commentNodes}
      </div>
    );
  }
});

var CommentForm = React.createClass({
  render: function() {
    return (
      <form className="commentForm">
        <input type="text" placeholder="Your name" />
        <input type="text" placeholder="Say something..." />
        <input type="submit" value="Post" />
      </form>
    );
  }
});

ReactDOM.render(
  <CommentBox url="/api/comments" pollInterval={2000} />,
  document.getElementById('content')
);

若child需要向parent传递值,则

//修改以下两个模块的代码
var CommentForm = React.createClass({
  getInitialState: function() {
    return {author: '', text: ''};
  },
  handleAuthorChange: function(e) {
    this.setState({author: e.target.value});
  },
  handleTextChange: function(e) {
    this.setState({text: e.target.value});
  },
  handleSubmit: function(e) {
    e.preventDefault();
    var author = this.state.author.trim();
    var text = this.state.text.trim();
    if (!text || !author) {
      return;
    }
    this.props.onCommentSubmit({author: author, text: text});
    this.setState({author: '', text: ''});
  },
  render: function() {
    return (
      <form className="commentForm" onSubmit={this.handleSubmit}>
        <input
          type="text"
          placeholder="Your name"
          value={this.state.author}
          onChange={this.handleAuthorChange}
        />
        <input
          type="text"
          placeholder="Say something..."
          value={this.state.text}
          onChange={this.handleTextChange}
        />
        <input type="submit" value="Post" />
      </form>
    );
  }
});
var CommentBox = React.createClass({
  loadCommentsFromServer: function() {
    $.ajax({
      url: this.props.url,
      dataType: 'json',
      cache: false,
      success: function(data) {
        this.setState({data: data});
      }.bind(this),
      error: function(xhr, status, err) {
        console.error(this.props.url, status, err.toString());
      }.bind(this)
    });
  },
  handleCommentSubmit: function(comment) {
    var comments = this.state.data;
    <!-- Optimistically set an id on the new comment. It will be replaced by an id generated by the server. In a production application you would likely not use Date.now() for this and would have a more robust system in place.-->
    comment.id = Date.now();
    var newComments = comments.concat([comment]);
    this.setState({data: newComments});
    $.ajax({
      url: this.props.url,
      dataType: 'json',
      type: 'POST',
      data: comment,
      success: function(data) {
        this.setState({data: data});
      }.bind(this),
      error: function(xhr, status, err) {
        this.setState({data: comments});
        console.error(this.props.url, status, err.toString());
      }.bind(this)
    });
  },
  getInitialState: function() {
    return {data: []};
  },
  componentDidMount: function() {
    this.loadCommentsFromServer();
    setInterval(this.loadCommentsFromServer, this.props.pollInterval);
  },
  render: function() {
    return (
      <div className="commentBox">
        <h1>Comments</h1>
        <CommentList data={this.state.data} />
        <CommentForm onCommentSubmit={this.handleCommentSubmit} />
      </div>
    );
  }
});
|