Gradle构建SpringBoot+Mybatis集成分页插件PageHelper

可点击此处下载完整项目哦:Springboot-Mybatis-Gradle

使用Gradle构建SpringBoot项目,使用Mybatis来持久化,尝试集成PageHelper分页插件,依然顺利都令到我吃惊,so easy!
首先,build.gradle中配置依赖

dependencies {
    compile group: 'com.github.pagehelper', name: 'pagehelper', version: '4.1.0'
}

其次,写一个注册类

package com.cc.config;

import java.util.Properties;  
import org.springframework.context.annotation.Bean;  
import org.springframework.context.annotation.Configuration;  
import com.github.pagehelper.PageHelper;  

/*  
* 注册MyBatis分页插件PageHelper  
*/  

@Configuration  
public class MybatisConf {  
      @Bean  
      public PageHelper pageHelper() {  
         System.out.println("=========MyBatisConfiguration.pageHelper()");  
          PageHelper pageHelper = new PageHelper();  
          Properties p = new Properties();  
          p.setProperty("offsetAsPageNum", "true");  
          p.setProperty("rowBoundsWithCount", "true");  
          p.setProperty("reasonable", "true");  
          pageHelper.setProperties(p);  
          return pageHelper;  
      }  
} 

最后,在controller中直接使用即可:

  @ApiOperation(value="根据姓名查找用户", notes="根据name来查找")
@ApiImplicitParam(paramType="query", name = "name", value = "用户姓名", required = true, dataType = "String")
@RequestMapping(value="/findByName",method=RequestMethod.POST) 
@ResponseBody
public List<User> findByName(@RequestParam(value="name", required=true) String name){  
    /*  
     * 第一个参数是第几页;第二个参数是每页显示条数。  
     */  
    PageHelper.startPage(1,2);  
    return userService.fingByName(name);  
}

深入使用还待我继续研究enter description here

ecplise之SpringBoot热部署

越来越体会到SpringBoot的强大好用,热部署是一个开发过程中必须要用到的功能,eclipse集成JRebel实现SpringMVC工程的热部署费了我九牛二虎之力才好,这次竟然能这么easy就设置成功例如,真是出乎意料啊,ღ( ´・ᴗ・` )。
Gradle项目中,首先安装配置依赖

dependencies {
    compile group: 'org.springframework', name: 'springloaded', version:'1.2.6.RELEASE'
}

其次,eclipse中需要在Run as->Run Configurations…中设置一下配置

-javaagent:E:\mybatis\springloaded-1.2.6.RELEASE.jar -noverify

enter description here

最后重启项目搞定!

Gradle构建SpringBoot集成Swagger2

[TOC]

可点击此处下载完整项目哦:Springboot-Mybatis-Gradle

最近SpringMVC转Spring Boot,搭建全新的项目框架,也学到不少的新东西。鉴于现在的忘形比记性好,还是写下来记录一下,分享进步。(PS:适合跟我一样刚入手的新人哦,大牛们请绕道(๑╹◡╹)ノ”””)

build.gradle

build.gradle中配置依赖的jar包

dependencies {
    compile group: 'io.springfox', name: 'springfox-swagger2', version:'2.2.2'
    compile group: 'io.springfox', name: 'springfox-swagger-ui', version:'2.2.2'

}

Swagger2配置类

在Application.java同级创建Swagger2的配置类Swagger2。

package com.cc.config;

import org.springframework.context.annotation.Bean;
import org.springframework.context.annotation.Configuration;

import springfox.documentation.builders.ApiInfoBuilder;
import springfox.documentation.builders.PathSelectors;
import springfox.documentation.builders.RequestHandlerSelectors;
import springfox.documentation.service.ApiInfo;
import springfox.documentation.spi.DocumentationType;
import springfox.documentation.spring.web.plugins.Docket;
import springfox.documentation.swagger2.annotations.EnableSwagger2;

@Configuration
@EnableSwagger2
public class Swagger2 {

  @Bean
  public Docket createRestApi() {
    return new Docket(DocumentationType.SWAGGER_2)
            .apiInfo(apiInfo())
            .select()
            .apis(RequestHandlerSelectors.basePackage("com.cc.controller"))
            .paths(PathSelectors.any())
            .build();
  }

  private ApiInfo apiInfo() {
    return new ApiInfoBuilder()
            .title("Gradle构建Spring boot项目")
            .description("Gradle构建Spring boot项目 集成mybatis使用pagehelper插件 ,实现热部署 by 陈晨")
            .termsOfServiceUrl("http://blog.csdn.net/chen1218chen")
            .contact("chenchen")
            .version("1.0")
            .build();
  }
}

记得@Configuration注解,通过@Configuration注解,让Spring来加载该类配置。再通过@EnableSwagger2注解来启用Swagger2。

com.cc.controller待扫描的接口包,Swagger会扫描该包下所有Controller定义的API ,并生成API文档(除了被@ApiIgnore指定的请求)。

Swagger2默认将所有的Controller中的RequestMapping方法都会暴露,然而在实际开发中,我们并不一定需要把所有API都提现在文档中查看,这种情况下,使用注解@ApiIgnore来解决,如果应用在Controller范围上,则当前Controller中的所有方法都会被忽略,如果应用在方法上,则对应用的方法忽略暴露API

添加文档内容

通过@ApiOperation注解来给API增加说明、通过@ApiImplicitParams@ApiImplicitParam注解来给参数增加说明

@RestController
public class UserController {
    @Autowired
    private UserService userService;

    @RequestMapping(value = "/", method=RequestMethod.GET)
    @ResponseBody
    public String hello() {
        return "hello";
    }

    @ApiOperation(value="查找用户", notes="根据age来查找")
    @ApiImplicitParam(name = "age", value = "用户age", required = true, dataType = "Integer")
    @RequestMapping("/index")  
    public List<User> selectAge(@RequestParam("age") int age){  

        return userService.showDao(age);  
    }  

    @ApiOperation(value="获取用户列表", notes="")
    @RequestMapping(value = "/queryAll", method=RequestMethod.GET)
    @ResponseBody
    public List<User> queryAll() {
        return userService.findAll();
    }
}

访问

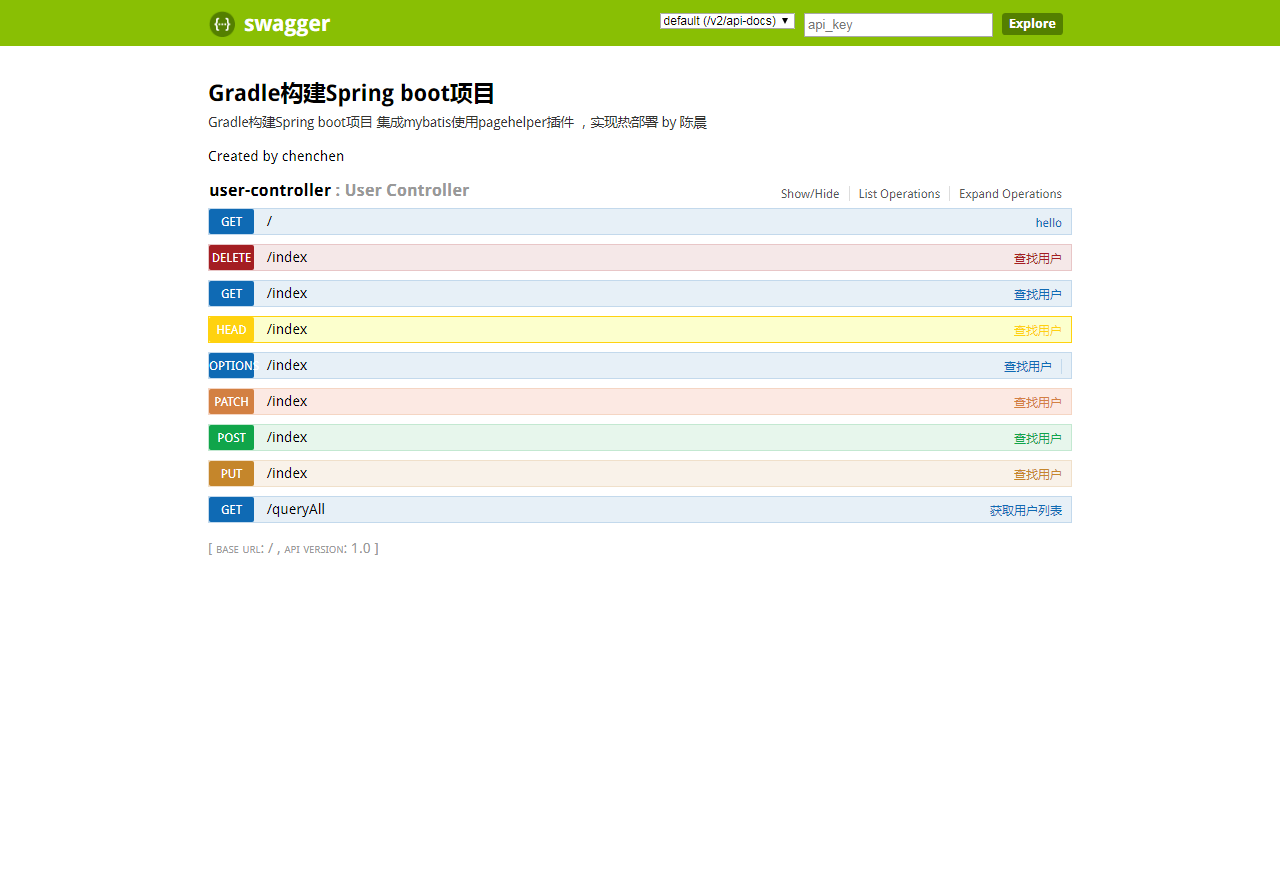
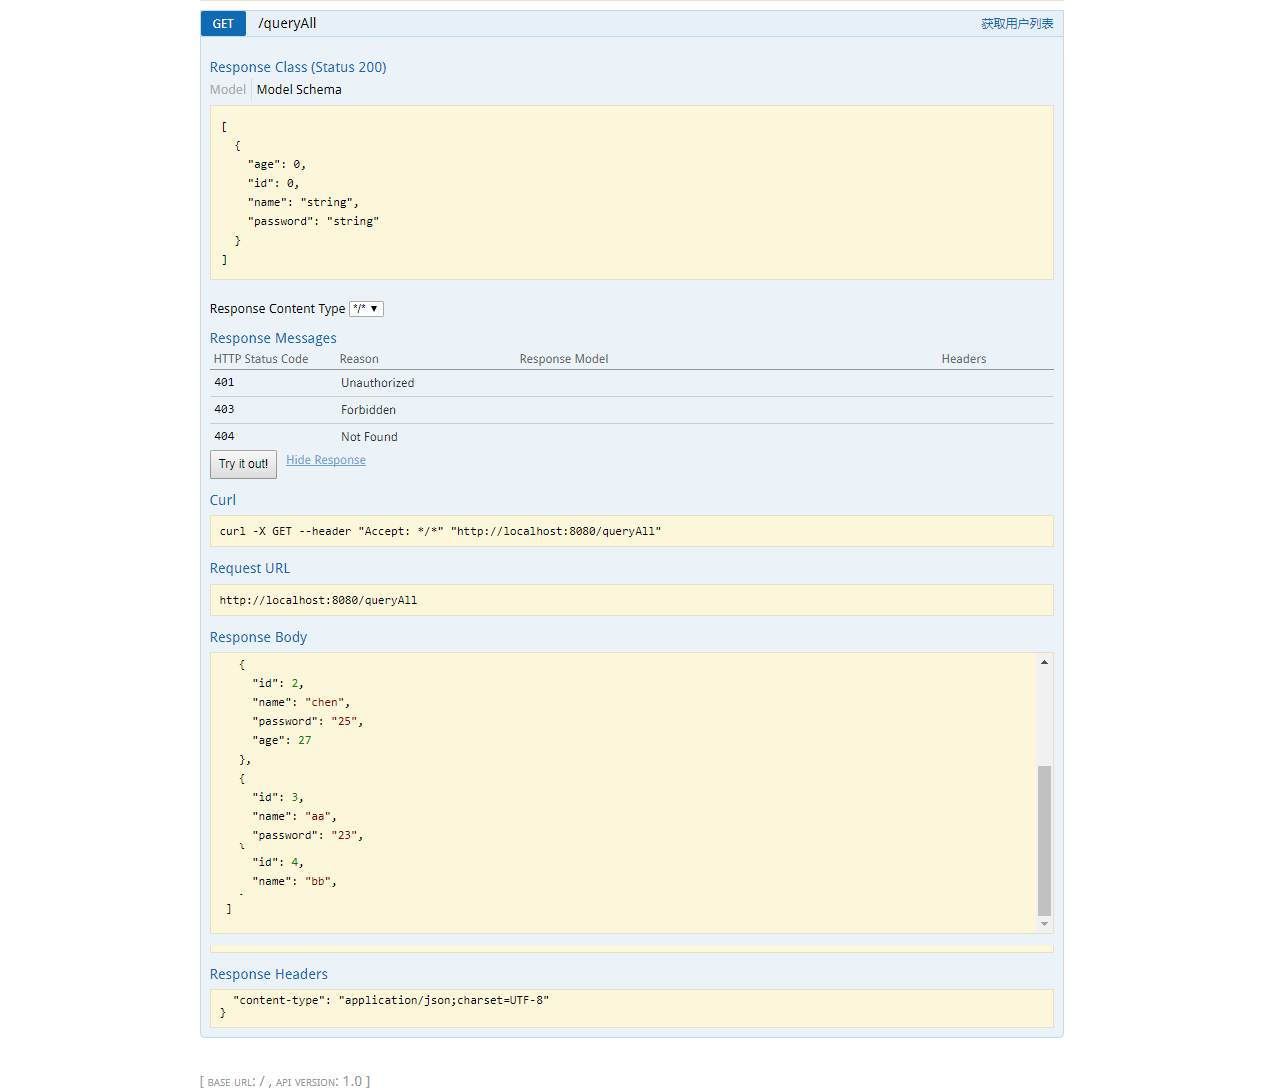
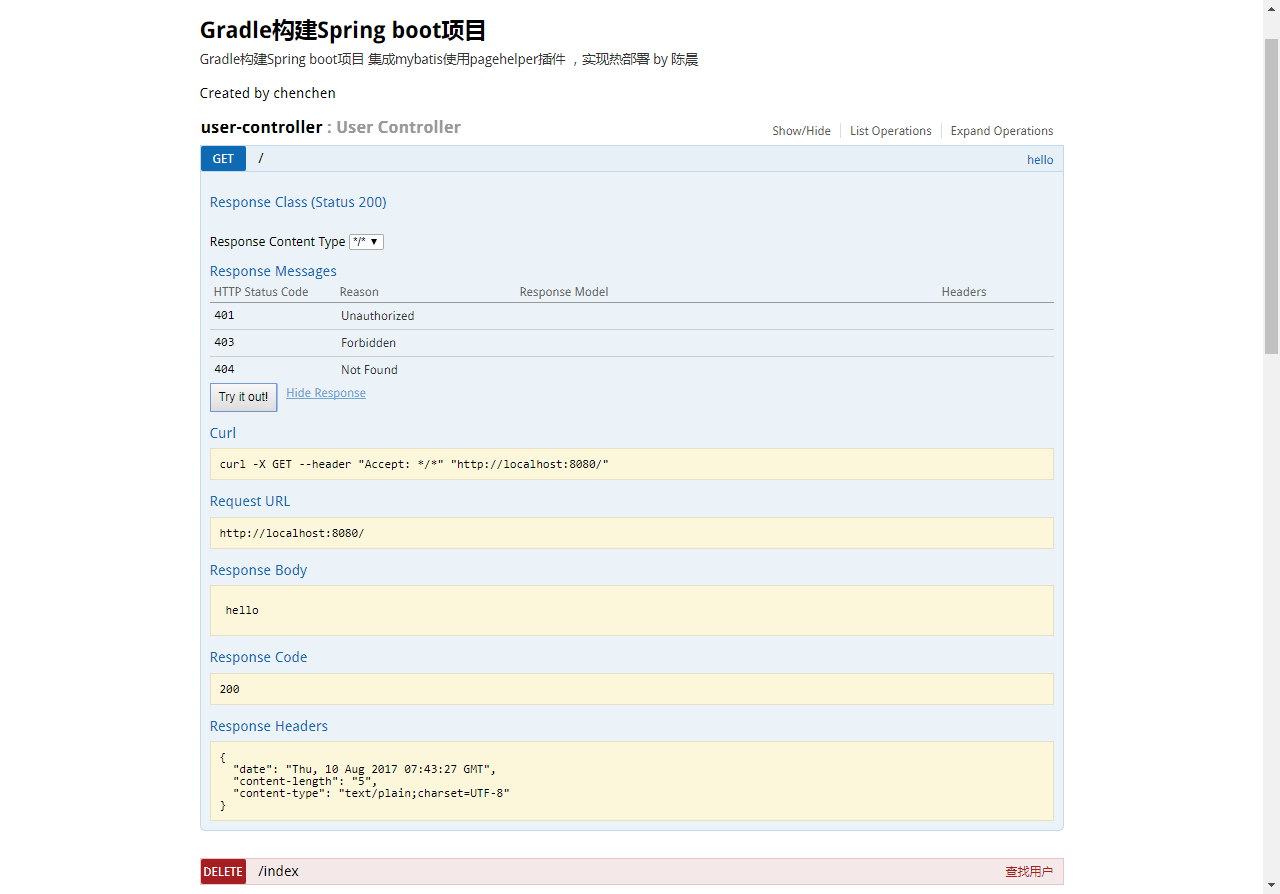
完成上述代码添加上,启动SpringBoot程序,访问:http://localhost:8080/swagger-ui.html

enter description here

enter description here

enter description here

js中毫秒转化成想要的时间格式

从后台传一个Date()数据类型

前台接受到的Date()类型数据

到前台进行格式化处理

var newTime = new Date(dateTime.time);

> Mon Aug 07 2017 15:01:28 GMT+0800 (中国标准时间)

在对newTime进行格式化

Date.prototype.format = function(fmt) { 
 var o = { 
    "M+" : this.getMonth()+1,                 //月份 
    "d+" : this.getDate(),                    //日 
    "h+" : this.getHours(),                   //小时 
    "m+" : this.getMinutes(),                 //分 
    "s+" : this.getSeconds(),                 //秒 
    "q+" : Math.floor((this.getMonth()+3)/3), //季度 
    "S"  : this.getMilliseconds()             //毫秒 
}; 
if(/(y+)/.test(fmt)) {
        fmt=fmt.replace(RegExp.$1, (this.getFullYear()+"").substr(4 - RegExp.$1.length)); 
}
 for(var k in o) {
    if(new RegExp("("+ k +")").test(fmt)){
         fmt = fmt.replace(RegExp.$1, (RegExp.$1.length==1) ? (o[k]) : (("00"+ o[k]).substr((""+ o[k]).length)));
     }
 }
return fmt; 
}

var time1 = newTime.format("yyyy-MM-dd hh:mm:ss");

得到

> 2017-08-07 15:01:28

SpringMVC中集成Sigar

sigar:系统信息收集和报表工具,开源的,用来收集服务器的CPU、内存、磁盘存储、网络监控等数据,除了需要在工程中引入sigar.jar包外,还需要在jdk的bin目录(D:\Program Files\Java1.7\jdk1.7.0_80\bin)下放sigar-amd64-winnt.dllsigar-x86-winnt.dll动态库。否则会报错,拿不到需要的服务器数据。

enter description here

Sublime text 3 之MarkdownEditing插件快捷键

Ctrl+Win+V 选中的内容将自动转换为行内式超链接,链接到剪贴板中的内容
Ctrl+Win+R 选中的内容将自动转换为参考式超链接,链接到剪贴板中的内容
Ctrl+Alt+R 弹出提示框插入一个参考式超链接,在提示框中输入链接内容和定义参考ID[^3]
Ctrl+Win+K 插入一个标准的行内式超链接
Win+Shift+K 插入一个标准的行内式图片(此快捷键可能与输入法有冲突)
Ctrl+1 至 Ctrl+6 插入一级至六级标题
Win+Alt+i 选中的内容转换为斜体
Win+Alt+b 选中的内容转换为粗体[^1]
Ctrl+Shift+6 自动插入一个脚注,并跳转到该脚注的定义中。
Alt+Shift+F 查找没有定义的脚注并自动添加其定义链接
Alt+Shift+G 查找没有定义的参考式超链接并自动添加其定义链接
Ctrl+Alt+S 脚注排序
Ctrl+Shift+. 缩进当前内容
Ctrl+Shift+, 提前当前内容

vue-cli多页面项目应用

[TOC]

vue-cli用来构建单页面应用很方便,直接生成一个vue-cli模板即可,最近一项目刚结束,为了后面的二期项目,想着用vue来重新搭建项目框架,实现前后端分离开发,也算是一个新的探索吧。跟大家分享一下一个新手入门时遇到的困惑不解,希望能帮到正处在迷茫期的你。

工程目录
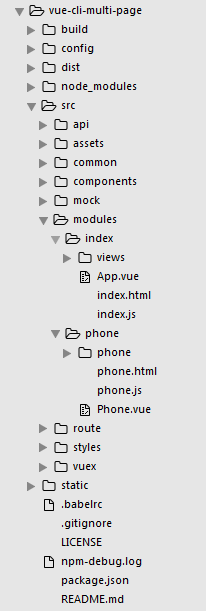
enter description here
modules下为多个页面入口,文件名称保持一致,如:

modules
  |---index
    |---index.html
    |---index.js

.vue文件名称任意。
原则上这些文件名称都可以随意定,但由于下面entry入口函数的限定,换成其他名字可以会找不到。如果想要起其他文件名,请相应修改getMultiEntry()函数。

添加多入口

until.js

until.js中添加getMultiEntry(),依赖 glob插件,需要提前下载好,until.js开始引入

//获取多级的入口文件
exports.getMultiEntry = function (globPath) {
  var entries = {},
    basename, tmp, pathname;

  glob.sync(globPath).forEach(function (entry) {
    basename = path.basename(entry, path.extname(entry));
    tmp = entry.split('/').splice(-4);

  var pathsrc = tmp[0]+'/'+tmp[1];
  if( tmp[0] == 'src' ){
    pathsrc = tmp[1];
  }
  //console.log(pathsrc)
    pathname = pathsrc + '/' + basename; // 正确输出js和html的路径
    entries[pathname] = entry;
    //console.log(pathname+'-----------'+entry);
  });

  return entries;
}

~\build\webpack.base.conf.js

找到entry,添加多入口

entry:entries,

运行、编译的时候每一个入口都会对应一个Chunk。 PS:终于明白这个chunk的含义了/(ㄒoㄒ)/~~

~\build\webpack.dev.conf.js

文末添加以下配置:

var pages =  utils.getMultiEntry('./src/'+config.moduleName+'/**/*.html');
for (var pathname in pages) {
  // 配置生成的html文件,定义路径等
  var conf = {
    filename: pathname + '.html',
    template: pages[pathname], // 模板路径
    chunks: [pathname, 'vendors', 'manifest'], // 每个html引用的js模块
    inject: true              // js插入位置
  };
  // 需要生成几个html文件,就配置几个HtmlWebpackPlugin对象
  module.exports.plugins.push(new HtmlWebpackPlugin(conf));
}

其中config.moduleName = 'modules'

~\build\webpack.prod.conf.js

    ...

//构建生成多页面的HtmlWebpackPlugin配置,主要是循环生成
var pages =  utils.getMultiEntry('./src/'+config.moduleName+'/**/*.html');
for (var pathname in pages) {
  var conf = {
    filename: pathname + '.html',
    template: pages[pathname], // 模板路径
    chunks: ['vendor',pathname], // 每个html引用的js模块
    inject: true,              // js插入位置
  hash:true
  };

  webpackConfig.plugins.push(new HtmlWebpackPlugin(conf));
}

module.exports = webpackConfig

其中config.moduleName = 'modules'

至此,多页面的配置已经完成。访问地址为:
index : http://localhost:8088/modules/index.html
phone : http://localhost:8088/modules/phone.html

cnpm run build之后,在nginx中即可访问,访问地址为
index : http://localhost/modules/index.html
phone : http://localhost/modules/phone.html

其他相关配置

示例

module.exports = {
    entry: {
        index: './src/pages/index/index.js',
        list: './src/pages/list/index.js',
        common: [
            './src/base/base.js',
            './src/base/base.css'
        ]
    },
    output: {
        path: './asset/build/', // 文件编译输出路径改成 build
        publicpath: 'http://yourweb.com/asset/build/', // 这里替换成线上实际地址,可以修改 css 中对图片资源的引用路径。
        filename: '[name]_[hash:5].js' // 生成的文件名字,加上了5位的 hash值。当然了,位数和加hash的位置,你可以自己定义,比如 '[name].js?[hash]'.
    },
    // 其它配置...
};

entry配置入口文件,多入口会独立打包3个实体。分别是 index.js, list.js, common.js。

webpack别名 resolve.alias

resolve: {
   alias: {
       moment: "moment/min/moment-with-locales.min.js"
   }
 }

这样待打包的脚本中的require('moment');其实就等价于require('moment/min/moment-with-locales.min.js');通过别名的使用在本例中可以减少几乎一半的时间。

output.filename缓存参数

filename: '[name].[hash].js'

生成 vendors.61714a310523a3df9869.js,每次生成都不会覆盖之前的代码,以方便查BUG或者回滚。

第二种方法:

filename: '[name].js'

生成vendors.js?f3aaf25de220e214f84e,每次都会覆盖之前生成的资源,方便在某些特殊项目使用。

process.env.NODE_ENV

指的是config/*下文件中的配置。

vue-cli的webpack项目分析之build/dev-server.js

[TOC]

执行”npm run dev“ 命令的时候可以看到最先执行的是build/dev-server.js文件,所以就从dev-server.js文件开始分析吧,这在里mark一下,算是学习记录,也顺便跟大家分享一下。

dev-server.js分析

检查node和npm的版本

require('./check-versions')()

获取config目录的默认配置,并且会默认指定index.js文件

var config = require('../config')
if (!process.env.NODE_ENV) process.env.NODE_ENV = config.dev.env
var path = require('path')
var express = require('express')
var webpack = require('webpack')

一个可以强制打开浏览器并跳转到指定 url 的插件

var opn = require('opn')

http-proxy可以实现转发所有请求代理到后端真实API地址,以实现前后端开发完全分离;
使用 proxyTable

var proxyMiddleware = require('http-proxy-middleware')

根据 Node 环境来引入相应的 webpack 配置

var webpackConfig = process.env.NODE_ENV === 'testing'
  ? require('./webpack.prod.conf')
  : require('./webpack.dev.conf')

// default port where dev server listens for incoming traffic
var port = process.env.PORT || config.dev.port
// Define HTTP proxies to your custom API backend
// https://github.com/chimurai/http-proxy-middleware
var proxyTable = config.dev.proxyTable

var app = express()
var compiler = webpack(webpackConfig)

var devMiddleware = require('webpack-dev-middleware')(compiler, {
  publicPath: webpackConfig.output.publicPath,
  stats: {
    colors: true,
    chunks: false
  }
})

var hotMiddleware = require('webpack-hot-middleware')(compiler)
// force page reload when html-webpack-plugin template changes
compiler.plugin('compilation', function (compilation) {
  compilation.plugin('html-webpack-plugin-after-emit', function (data, cb) {
    hotMiddleware.publish({ action: 'reload' })
    cb()
  })
})

// proxy api requests
Object.keys(proxyTable).forEach(function (context) {
  var options = proxyTable[context]
  if (typeof options === 'string') {
    options = { target: options }
  }
  app.use(proxyMiddleware(context, options))
})

// handle fallback for HTML5 history API
app.use(require('connect-history-api-fallback')())

// serve webpack bundle output
app.use(devMiddleware)

// enable hot-reload and state-preserving
// compilation error display
app.use(hotMiddleware)

// serve pure static assets
var staticPath = path.posix.join(config.dev.assetsPublicPath, config.dev.assetsSubDirectory)
app.use(staticPath, express.static('./static'))

module.exports = app.listen(port, function (err) {
  if (err) {
    console.log(err)
    return
  }
  var uri = 'http://localhost:' + port
  console.log('Listening at ' + uri + '\n')
  opn(uri)
})

process.env.NODE_ENV

获取系统环境变量,在config/pro.env.js和config/dev.env.js中定义好的。

pro.env.js

module.exports = {
  NODE_ENV: '"production"',
  API_ROOT: '"//127.0.0.1/api"'
}

dev.env.js

var merge = require('webpack-merge')
var prodEnv = require('./prod.env')

module.exports = merge(prodEnv, {
  NODE_ENV: '"development"',
  API_ROOT: '"//127.0.0.1/api"'
})

从代码中看到,dev-server使用的webpack配置来自build/webpack.dev.conf.js文件(测试环境下使用的是build/webpack.prod.conf.js,这里暂时不考虑测试环境)。而build/webpack.dev.conf.js中又引用了webpack.base.conf.js,所以这里我先分析webpack.base.conf.js。

webpack.base.conf.js

webpack.base.conf.js主要完成了下面这些事情:

  • 配置webpack编译入口
  • 配置webpack输出路径和命名规则
  • 配置模块resolve规则
  • 配置不同类型模块的处理规则

node.js的path模快

Node.js path 模块提供了一些用于处理文件路径的小工具,我们可以通过以下方式引入该模块:
创建 main.js 文件,代码如下所示:

var path = require("path")
// 格式化路径
console.log('normalization : ' + path.normalize('/test/test1//2slashes/1slash/tab/..'));

// 连接路径
console.log('joint path : ' + path.join('/test', 'test1', '2slashes/1slash', 'tab', '..'));

// 转换为绝对路径
console.log('resolve : ' + path.resolve('main.js'));

// 路径中文件的后缀名
console.log('ext name : ' + path.extname('main.js'));
//获取用"/"隔开的path最后的一部分
console.log('basename: '+ path.basename('./src/views/nav1/table.js'));

代码执行结果如下:

$ node main.js 
normalization : /test/test1/2slashes/1slash
joint path : /test/test1/2slashes/1slash
resolve : /web/com/1427176256_27423/main.js
ext name : .js
basename : table.js

content-type详解

web项目开发中经常会遇到content-type属性的问题,尤其是关于一些中文乱码和浏览器端文件下载的问题中,解决方法一般都会需要在html页面上或者后台java代码中对content-type进行设置。查阅一些资料详细了解一下这个看着熟悉实则不太理解的属性。

MediaType,即是Internet Media Type,互联网媒体类型;也叫做MIME类型,在Http协议消息头中,使用Content-Type来表示具体请求中的媒体类型信息。

常见的媒体格式类型如下:

  • text/html : HTML格式
  • text/plain :纯文本格式
  • text/xml : XML格式
  • image/gif :gif图片格式
  • image/jpeg :jpg图片格式
  • image/png:png图片格式

以application开头的媒体格式类型:

  • application/xhtml+xml :XHTML格式
  • application/xml : XML数据格式
  • application/atom+xml :Atom XML聚合格式
  • application/json : JSON数据格式
  • application/pdf :pdf格式
  • application/msword : Word文档格式
  • application/octet-stream : 二进制流数据(如常见的文件下载)
  • application/x-www-form-urlencoded :
    中默认的encType,form表单数据被编码为key/value格式发送到服务器(表单默认的提交数据的格式)

另外一种常见的媒体格式是上传文件之时使用的:

  • multipart/form-data : 需要在表单中进行文件上传时,就需要使用该格式

以上就是我们在日常的开发中,经常会用到的若干content-type的内容格式。

http请求 content-type对照表
springMVC rest请求中content-type的应用

|