[TOC]
vue-cli用来构建单页面应用很方便,直接生成一个vue-cli模板即可,最近一项目刚结束,为了后面的二期项目,想着用vue来重新搭建项目框架,实现前后端分离开发,也算是一个新的探索吧。跟大家分享一下一个新手入门时遇到的困惑不解,希望能帮到正处在迷茫期的你。
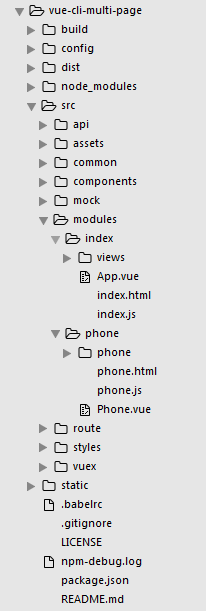
工程目录

modules下为多个页面入口,文件名称保持一致,如:
modules
  |---index
    |---index.html
    |---index.js
.vue文件名称任意。
原则上这些文件名称都可以随意定,但由于下面entry入口函数的限定,换成其他名字可以会找不到。如果想要起其他文件名,请相应修改getMultiEntry()函数。
添加多入口
until.js
until.js中添加getMultiEntry(),依赖 glob插件,需要提前下载好,until.js开始引入
//获取多级的入口文件
exports.getMultiEntry = function (globPath) {
  var entries = {},
    basename, tmp, pathname;

  glob.sync(globPath).forEach(function (entry) {
    basename = path.basename(entry, path.extname(entry));
    tmp = entry.split('/').splice(-4);

  var pathsrc = tmp[0]+'/'+tmp[1];
  if( tmp[0] == 'src' ){
    pathsrc = tmp[1];
  }
  //console.log(pathsrc)
    pathname = pathsrc + '/' + basename; // 正确输出js和html的路径
    entries[pathname] = entry;
    //console.log(pathname+'-----------'+entry);
  });

  return entries;
}
~\build\webpack.base.conf.js
找到entry,添加多入口
entry:entries,
运行、编译的时候每一个入口都会对应一个Chunk。 PS:终于明白这个chunk的含义了/(ㄒoㄒ)/~~
~\build\webpack.dev.conf.js
文末添加以下配置:
var pages =  utils.getMultiEntry('./src/'+config.moduleName+'/**/*.html');
for (var pathname in pages) {
  // 配置生成的html文件,定义路径等
  var conf = {
    filename: pathname + '.html',
    template: pages[pathname], // 模板路径
    chunks: [pathname, 'vendors', 'manifest'], // 每个html引用的js模块
    inject: true              // js插入位置
  };
  // 需要生成几个html文件,就配置几个HtmlWebpackPlugin对象
  module.exports.plugins.push(new HtmlWebpackPlugin(conf));
}
其中config.moduleName = 'modules'
~\build\webpack.prod.conf.js
    ...

//构建生成多页面的HtmlWebpackPlugin配置,主要是循环生成
var pages =  utils.getMultiEntry('./src/'+config.moduleName+'/**/*.html');
for (var pathname in pages) {
  var conf = {
    filename: pathname + '.html',
    template: pages[pathname], // 模板路径
    chunks: ['vendor',pathname], // 每个html引用的js模块
    inject: true,              // js插入位置
  hash:true
  };

  webpackConfig.plugins.push(new HtmlWebpackPlugin(conf));
}

module.exports = webpackConfig
其中config.moduleName = 'modules'
至此,多页面的配置已经完成。访问地址为:
index : http://localhost:8088/modules/index.html
phone : http://localhost:8088/modules/phone.html
cnpm run build之后,在nginx中即可访问,访问地址为
index : http://localhost/modules/index.html
phone : http://localhost/modules/phone.html
其他相关配置
示例
module.exports = {
    entry: {
        index: './src/pages/index/index.js',
        list: './src/pages/list/index.js',
        common: [
            './src/base/base.js',
            './src/base/base.css'
        ]
    },
    output: {
        path: './asset/build/', // 文件编译输出路径改成 build
        publicpath: 'http://yourweb.com/asset/build/', // 这里替换成线上实际地址,可以修改 css 中对图片资源的引用路径。
        filename: '[name]_[hash:5].js' // 生成的文件名字,加上了5位的 hash值。当然了,位数和加hash的位置,你可以自己定义,比如 '[name].js?[hash]'.
    },
    // 其它配置...
};
entry配置入口文件,多入口会独立打包3个实体。分别是 index.js, list.js, common.js。
webpack别名 resolve.alias
resolve: {
   alias: {
       moment: "moment/min/moment-with-locales.min.js"
   }
 }
这样待打包的脚本中的require('moment');其实就等价于require('moment/min/moment-with-locales.min.js');通过别名的使用在本例中可以减少几乎一半的时间。
output.filename缓存参数
filename: '[name].[hash].js'
生成 vendors.61714a310523a3df9869.js,每次生成都不会覆盖之前的代码,以方便查BUG或者回滚。
第二种方法:
filename: '[name].js'
生成vendors.js?f3aaf25de220e214f84e,每次都会覆盖之前生成的资源,方便在某些特殊项目使用。
process.env.NODE_ENV
指的是config/*下文件中的配置。